

Introduction to the Curriculum
Reading a Photograph
|
Time: |
50 minutes |
|
Materials: |
Laptop and projector or monitor |
|
Preparation: |
Set up projector to display the photograph Cave at the front of the room. If laptop and projector are not available, make high-resolution photocopies of the photograph to distribute to students. Also, make enough copies of Worksheet B for the class. |
|
Overview: |
In this lesson, students practice their close-looking and visual literacy skills by making objective and subjective observations of a photograph and then responding to the image through creative writing. |
|
Big Idea: |
Photography is a form of communication. One can “read” and respond to a photograph in ways that are analogous to reading and responding to written texts. |
Introduction (5 minutes):
Encourage students to support their subjective interpretations with objective observations, asking, for example, “Why do you think that?” or “What did you see in the photograph that made you say that?
-
Ask students: What is the difference between an “objective fact” and a “subjective interpretation”? Ask students to give examples of each.
-
Project or distribute the photograph Cave.
-
Distribute copies of Worksheet B (Objective and Subjective).
-
Review the worksheet. Explain that an objective observation is something that doesn’t change from person to person. It’s something you can all agree on; for example, “there are X number of people in this photo,” or “the photograph is in black-and-white.” Objective observations might also refer to the shapes, textures, and shadows that can be seen in the photo. A subjective observation, on the other hand, is an opinion, a feeling, or an interpretation based on what you see, such as, “it reminds me of the time I did X,” or “I think that man might be their father,” or “I think they look tired.”
Differentiating between objective and subjective is like differentiating between evidence and argument. Just as a subjective observation must be based on objective elements, so too must an opinion or argument be based on factual evidence. Similarly, a multitude of arguments or opinions can often derive from the same evidence—although usually, the most compelling argument will be the one that makes the most sense of the facts. Help students understand the connection between the objective/subjective exercise and the way they build an argument in writing or in debate.
At times, it can be hard to know if a given observation is objective or subjective. In these cases, students needn’t get too hung up on the distinction—the objective/subjective dichotomy is merely a device to help students organize and reflect on their own looking.
Objective and Subjective (15 minutes):
-
Once students have grasped the distinction between objective and subjective observations, give them time to study the photograph carefully. Have them note their observations on their worksheets. Give students plenty of time to work and encourage them to record everything they see or think about the photograph. Even when they claim to be finished, encourage them to go back and make sure there isn’t anything they’ve missed.
-
Have students share their observations in a whole-group discussion. Record on the board all the objective and subjective observations the class has come up with and discuss any questionable or conflicting observations. Invite students up to direct the looking by pointing to details in the image. Encourage students to support their subjective interpretations with objective observations, asking, for example, “Why do you think that?” or “What did you see in the photograph that made you say that?”
-
Ask students what one can and cannot learn from the photograph. What questions does it raise? What additional information would they like to know about it?
-
Also, ask students to consider the composition of the photograph—that is, the way the elements of the photograph work together (for example, the angle of the camera, the relationships among the figures, the focal point of the picture, etc.). How does the composition add to the meaning or impact of the photograph?
Creative Response to Photography (20 minutes):
-
Have students respond in one of the following ways to the photograph.
-
Ask students to write about the scene, describing what they think happened just before the picture was taken and what they think will happen next.
-
Have students write a monologue from the point of view of one of the people in the photograph.
-
Have students paste a photocopy of the image in the center of a piece of white paper and ask them to draw what they think is happening outside the frame of the photo.
-
Have students assume the physical positions of the figures in the photograph and then ask them to act out the scene.
-
After listing the students’ subjective observations, ask them to create poems about the photo, using the language of their observations. Have students share their work and discuss the relationship between visual art and poetry.
-
Make a photocopy of the image along with thought bubbles above the heads of some of the figures. Have students fill in the bubbles with what they think the subjects of the photograph are thinking.
-
Have students create a soundtrack for the image, or a “musical collage,” by editing music clips into a medley that expresses something about the photo.
-
-
Ask a few students to share their work with the rest of the class.
Wrap-Up (10 minutes):
Explain to students the difference between p’shat and drash in the study of traditional Jewish texts. The p’shat is the simple meaning of a text; drash refers to its interpretation. Help students understand how these concepts apply to reading a photograph.
-
Discuss:
-
What kinds of things can you learn from a photograph? What can’t you learn?
-
How is reading a photograph like reading a text? How is it different?
-
-
Share with students the actual context and background of the Photograph Cave. Explain to students that the photograph was taken by an Israeli-born photographer named Zion Ozeri who lives in New York. Ozeri travels around the world photographing different Jewish communities. Students will be looking at his photographs in more depth during the course and also taking photographs of their own. If you have time, share a few additional photos by Ozeri with students.
For Homework:
Ask students to log on to Ozeri's Jewish Lens gallery to view additional photographs by Ozeri and to learn more about the program.
Check out the Jewish Lens Photo Teaching Guide for photography tips and guidelines. (PENDING)
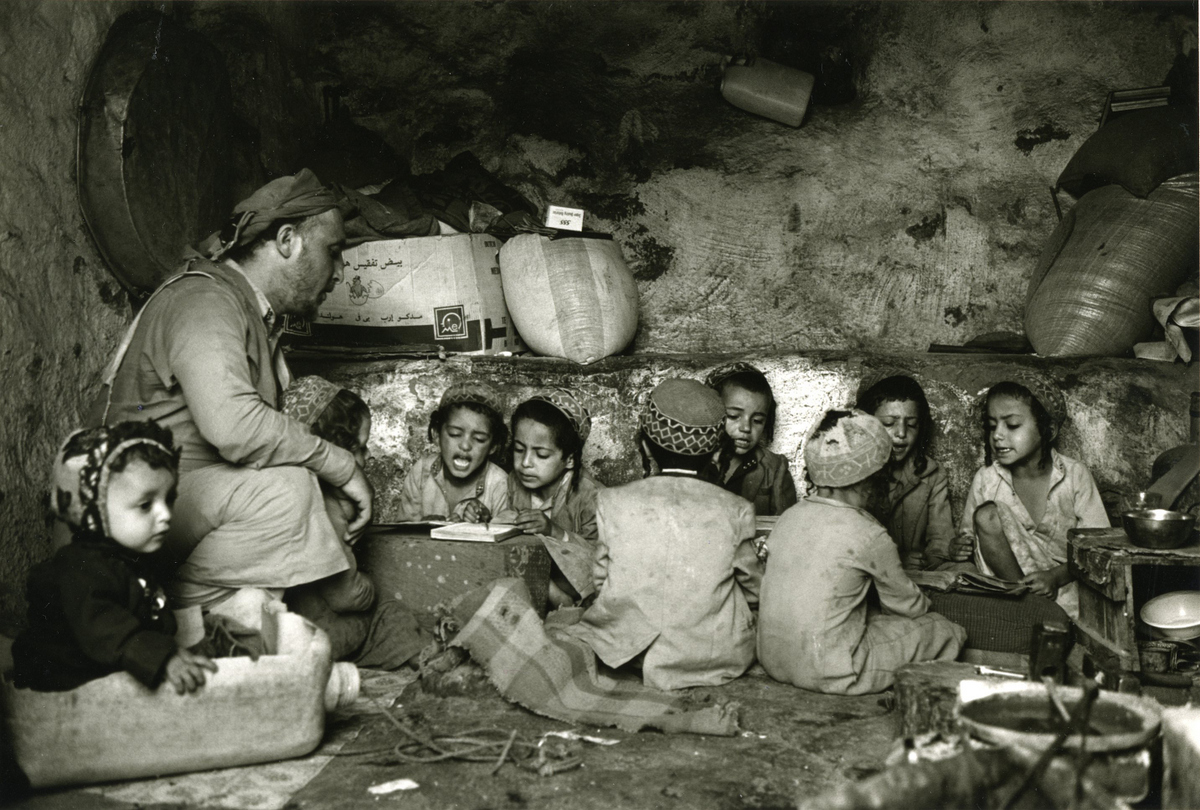
Cave, Haidan A-Sham, Yemen, 1992
All images © Zion Ozeri. All Rights Reserved.
You don’t need to be in a classroom or synagogue to study the Torah. You can do it almost anywhere—even in a cave. The town of Haidan A-Sham is located in a rugged and mountainous part of Yemen, and the Jews there made use of whatever spaces were available. These boys have gathered in a cave to study the weekly Torah portion. Since the time this photo was taken, most of the Jews have left that part of the country, moving to bigger cities or to Israel.
Jews first moved to Yemen in ancient times. They practiced their religion faithfully throughout the centuries but were generally treated as second-class citizens by the Muslim authorities. Because of the way they were treated, as well as their longing to return to the Jewish homeland, Yemenite Jews started immigrating to Israel in the late 1880s. This culminated in 1949 – 50 with a huge airlift known as Operation Magic Carpet. For the Yemenite Jews, this airlift seemed to fulfill Isaiah’s prophecy that the Jewish people would be brought to the promised land “on the wings of eagles.” Today, only a tiny number of Jews remain in Yemen.
Sample Texts:
At Sinai Moses received the Torah and handed it over to Joshua who handed it over to the elders who handed it over to the prophets who in turn handed it over to the men of the Great Assembly. The latter said three things: Be deliberate in judgment, raise up many disciples, and make a fence around the Torah.
– Pirkei Avot 1:1
Joshua ben Perachyah said, “Get yourself a teacher, find someone to study with, and judge everyone favorably.”
– Pirkei Avot 1:6